
Subject
94-y-o Caucasian, male
Cooking Teacher
Medical History
Fall that caused a brain injury, forgetfulness, confusion, and disorientation. Severe Scoliosis, congestive heart failure, chronic kidney disease type 4, hypertension
COD: Cardiac arrest d/t complete heart block
Learning Objectives
- Marking the surface projections of the clavicle, ribs, lungs, pleura, heart, and liver on your donor’s anterior thorax wall
- Recognizing major anatomical landmarks on your donor’s thorax MRI
Exercises on Silent Teacher
A. General examination
- Visually examine the chest for the presence of a Chest tube, a Subclavian catheter, or a bulge of a subcutaneously implanted Pacemaker.
- Look for the presence of a mid-sternal scar (indicative of surgery).
- Palpate the right and left clavicles to where they nearly meet in the midline, at the suprasternal notch. Continue palpating in an inferior direction from the suprasternal notch across the sternum. Click here to see a 3D artistic model for the thorax cage.
- Notice that the sternum exhibits a slight angle, termed the sternal angle. The sternal angle is at the level of articulation with the 2nd ribs (right and left). Using that as a landmark, palpate and count the ribs (hard to the touch) and intercostal spaces (soft-feeling spaces between ribs) until you reach the costal margin. Click here to see a 3D artistic model for costal margin.
- Using palpation, how many ribs can you count on one side between the sternal angle and the costal margin? Knowledge of this coordinate system (ribs and spaces) is important for the placement of EKG leads.
- If your cadaver is female, examine the breasts for possible palpable masses. Note if one or both breasts are present.
B. Outline these projections on your Silent Teacher using the pen provided.
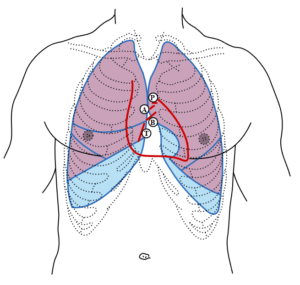
Figure: Front of thorax, showing surface relations of bones, lungs (purple), pleura (blue), and heart (red outline). P. Pulmonary valve. A. Aortic valve. B. Bicuspid valve. T. Tricuspid valve. (Source: Henry Gray (1918) Anatomy of the Human Body. Bartleby.com: Gray’s Anatomy, Plate 1216. Vectorized in Inkscape by Mysid)
Click here to see a 3D artistic model for surface projections of the thorax.
- The apex of the lung is found at the level of the neck of the 1st rib.
- The medial border runs inferiorly near the midsternal line.
- On the left side, the lung deviates by about 4-6 cm laterally at the level of ribs 4 and 5 to form the cardiac notch.
- The border of the lung then deflects laterally running down to the 8th rib at the midaxillary line.
- At this point, the surface projection of the lung’s inferior border proceeds medially until it reaches the junction of the 11th rib at which point it turns superiorly and runs to the apex.
- The parietal pleura runs a similar course, but descends inferiorly to the 10th rib at the midaxillary line and proceeds medially to the junction of the 12th rib and thoracic vertebra body.
- On the right side, identify the approximate position of the horizontal fissure which lies underneath the 4th rib and follow it laterally.
- The oblique fissures of both lungs extend laterally beginning at the origin of the 6th costochondral junction and continuing laterally within the 5th intercostal space (ICS).
C. Percussion of the thorax serves to identify cardiac borders and valves in living individuals and is an essential component of the physical examination. Trace out the surface projection of the heart on your Silent Teacher using the pen provided (click here for a simple example of this process).
- Begin by identifying the cadaver’s sternum, clavicle, and ribs 2-6 on the surface of the thoracic wall.
- Identify and name all intercostal spaces (e.g., ICS 2 is located between ribs 2 and 3).
- The areola and nipple lie at ICS 4 in the male (more variable in the female).
- Visually and manually (with your finger) outline the borders of the heart.
- The right border begins in ICS 2, approximately 2.5 cm lateral to the right sternal margin.
- Proceed with your line parallel to the body of the sternum and inferiorly to the xiphoid process. This right border represents the lateral borders of the right atrium and ventricle.
- The inferior border of the heart continues to the left side terminating at the apex of the heart which lies in ICS 5 and about 8-10 cm to the left of the midsternal line.
- The left border ascends following a line superiorly and medially from the PMI and ends in ICS 2, approximately 2.5 cm from the left sternal margin.
- A portion of the aortic arch projects onto ICS 1, just to the left of the manubrium.
D. Trace out the surface projection of the diaphragm and liver on your Silent Teacher using the pen provided.
Diaphragm: The diaphragm is a dome-shaped musculofibrous septum separating the abdomen and thorax. It is bounded above by both pleural spaces and the pericardium, which is attached to the central tendon. Structures immediately adjacent to the inferior side of the diaphragm include the liver, spleen, stomach, and to varying degrees the colon, omentum, and small bowel. The origin of the diaphragm includes the lower sternum, lower six costal cartilages, and adjacent ribs, and medial and lateral lumbocostal arches. The crura, two tendinous pillars, arise from the lumbar vertebrae. The insertion of the diaphragm is the central tendon, an aponeurosis, located at the top of the dome, is oriented transversely and separated into three segments. At rest, the diaphragm rises to the level of the fourth intercostal space on the right and the fifth intercostal space on the left.
Liver
The upper limit of the right lobe of the liver, in the middle line, is at the level of the junction between the body of the sternum and the xiphoid process; on the right side, the line must be carried upward as far as the fifth costal cartilage in the mammary line, and then downward to reach the seventh rib at the side of the thorax. The upper limit of the left lobe can be defined by continuing this line downward and to the left to the sixth costal cartilage, 5 cm. from the middle line. The lower limit can be indicated by a line drawn 1 cm below the lower margin of the thorax on the right side as far as the ninth costal cartilage, thence obliquely upward to the eighth left costal cartilage, crossing the middle line just above the transpyloric plane and finally, with a slight left convexity, to the end of the line indicating the upper limit.
Take three points:
(a) 1.25 cm below the right nipple
(b) 1.25 cm below the tip of the tenth rib
(c) 2.5 cm below the left nipple
Join (a) and (c) by a line slightly convex upward; (a) and (b) by a line slightly convex lateralward; and (b) and (c) by a line slightly convex downward.
Exercises on silent teachers’ MRI scans
(Please note rad3d requires sign-in/login) (Please watch the video here to learn how to adjust images)
- Please review your silent teachers’ MRI scans ( horizontal, sagittal, and coronal planes) and try to find the structures listed below. Please try to follow the same structure in consecutive sections.
OSTEOLOGY
- Manubrium
- Clavicle
- Ribs
- Vertebral bodies
- Scapulae
- Humerus
MUSCLES
- Pectoralis muscles
- Deltoid
- Rhomboid major and minor
- Trapezius
- Erector spinae
VISCERA AND COMPONENTS
- Trachea
- Right Atrium
- Right ventricle
- Left atrium
- Left ventricle
- Great Vessels: aorta, pulmonary trunk, brachiocephalic artery, superior vena cavae
- Thoracic aorta
- Esophagus
- Costodiaphragmatic recess, costomediastinal recess esophageal, cardiac)
- Pleura
- Pericardium
SPINAL CORD
- Subarachnoid space and CSF
- Spinal nerve, dorsal & ventral rami
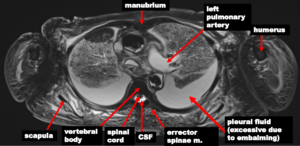
Here are some examples

Self Assessment